A Giant Crochet Doily Rug for Our Living Room
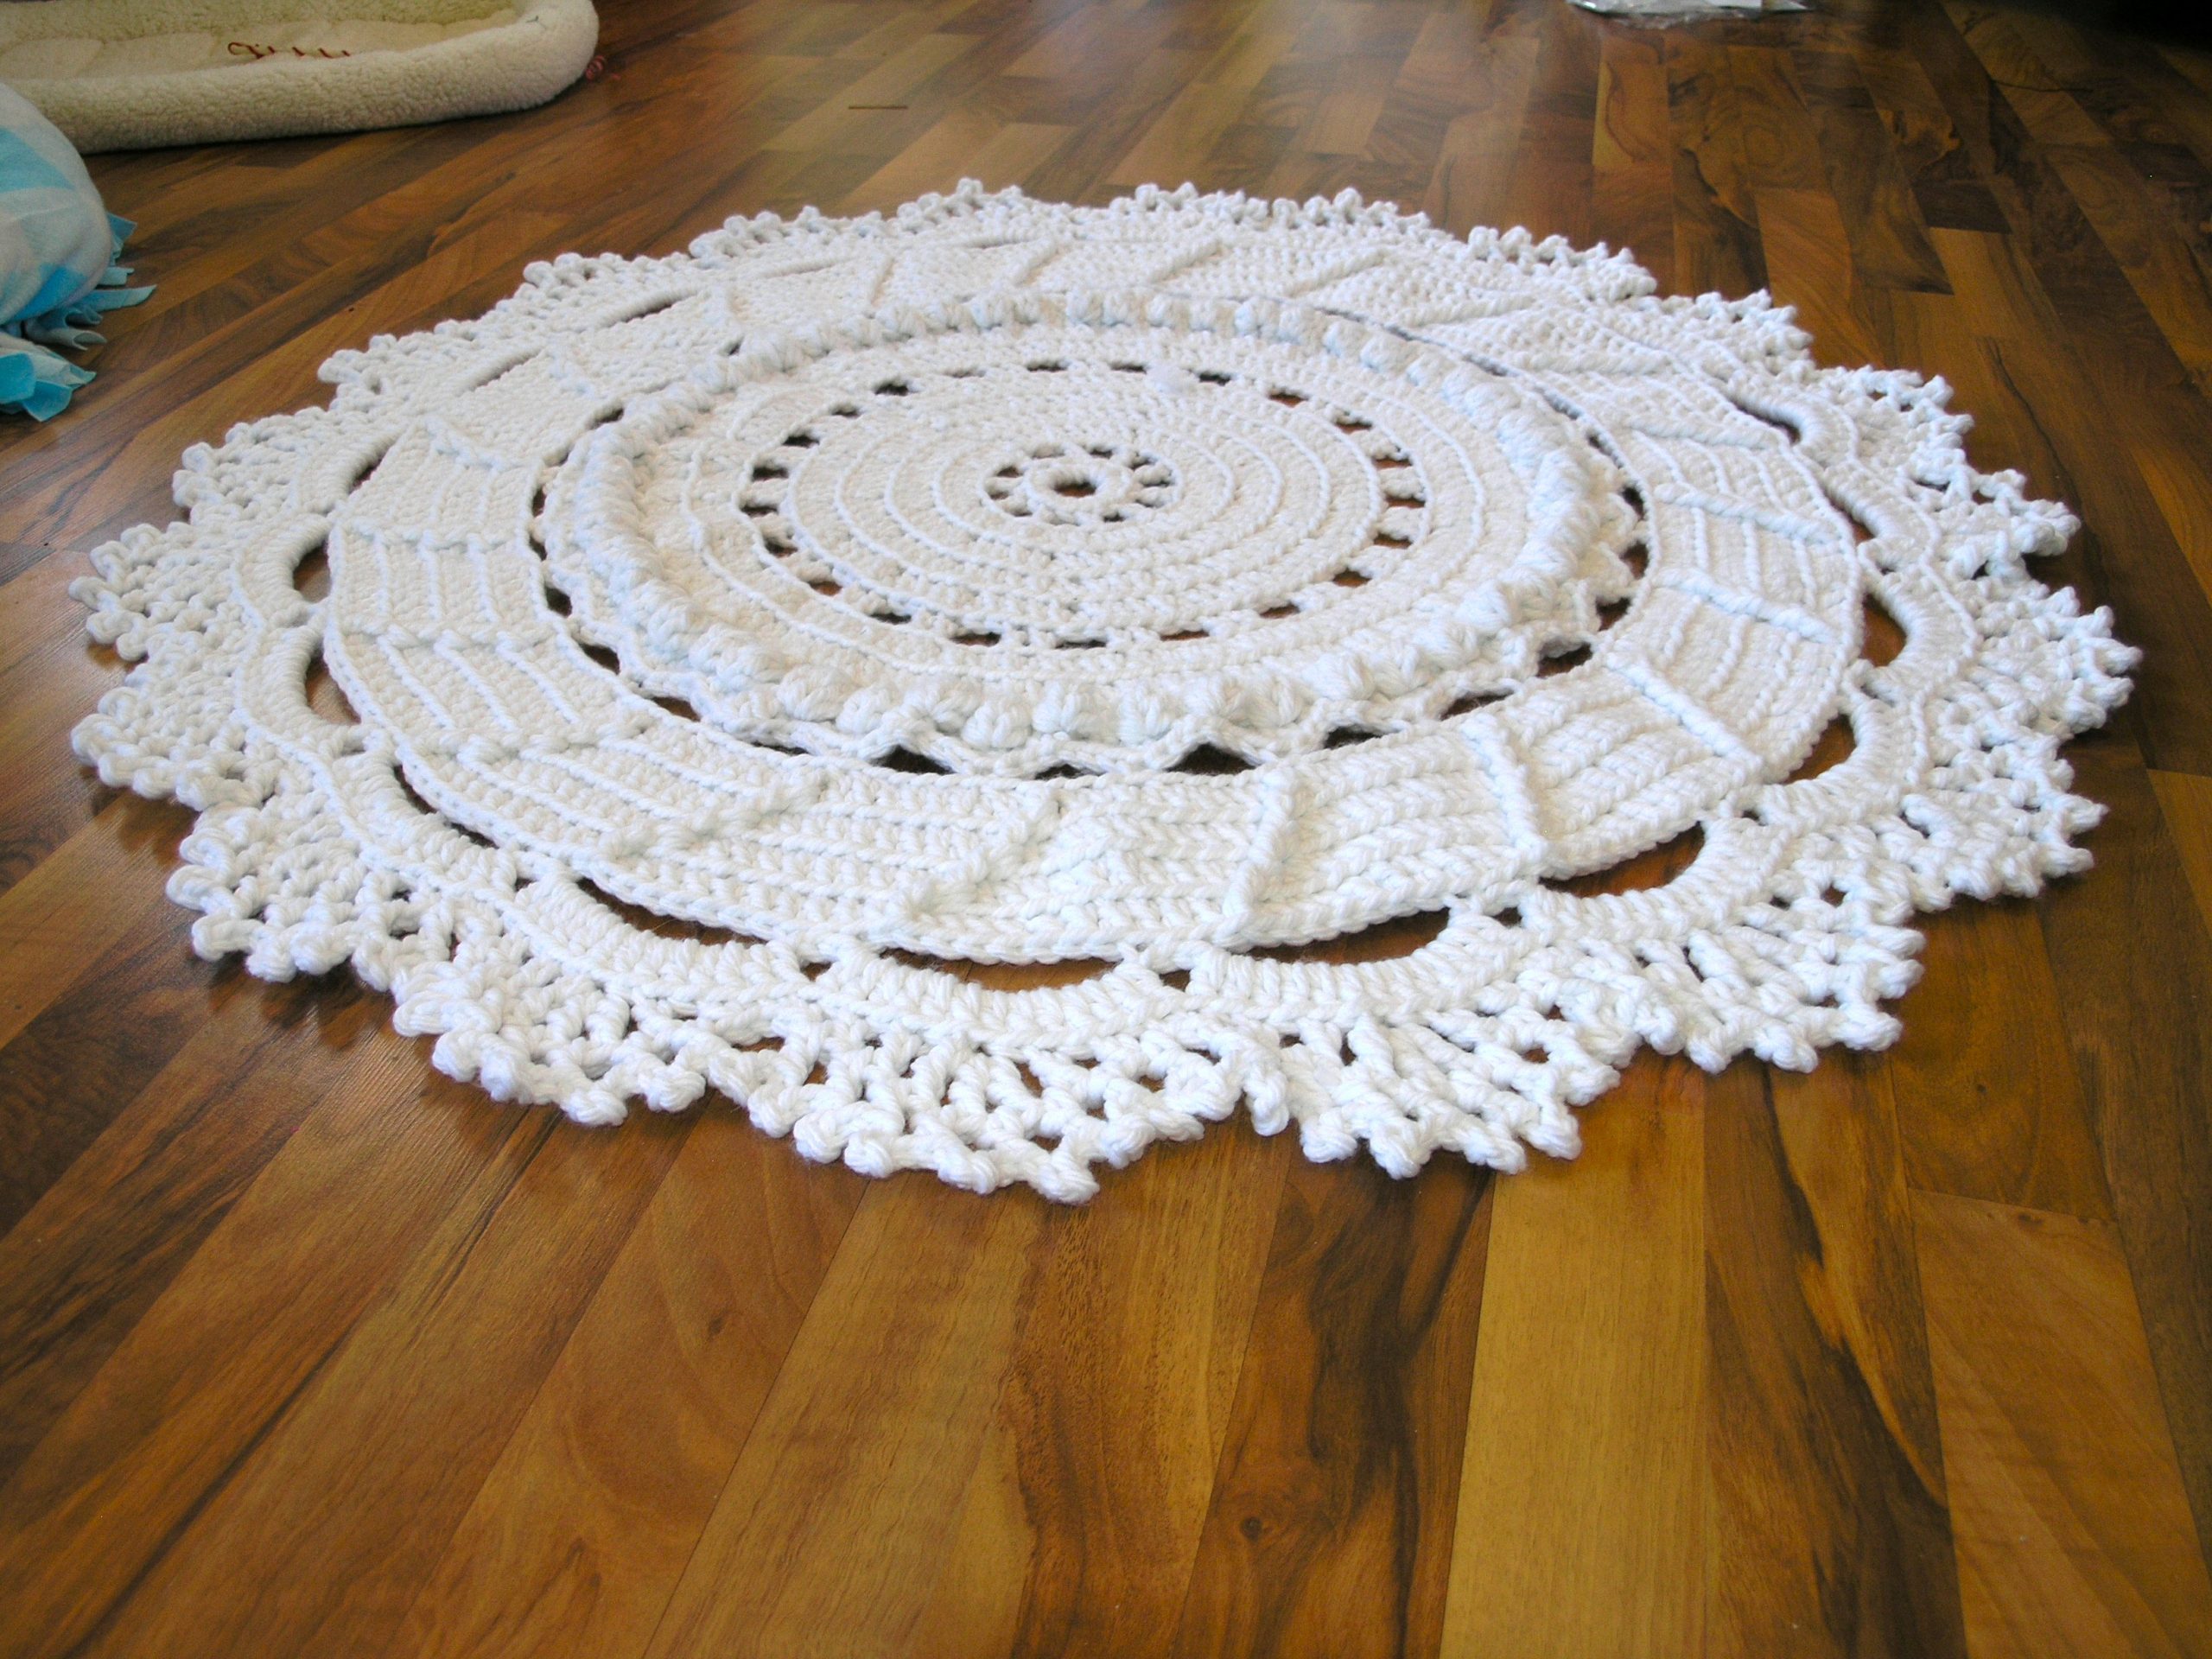
You’ve all seen the pictures on Pinterest for that giant doily rug. I repinned it myself. It’s just gorgeous and it led me to search for others of its kind. Sadly, there are many out there, but no one has bothered to offer up tutorials or patterns. Two weeks ago, I set out to correct this by making one of my own. I will warn you, what you’re about to read will be painful. It was painful as I was going through it, but the results were worth every single agonizing moment.
I ripped this apart and re-started three times. Varying parts of it were done, redone, and torn out no less than six times. I suffer from a terrible amount of OCD when it comes to such things. Every part of it had to be perfect or it wasn’t worth doing. The finished product is perfect (for me at least) and measures 45 inches in diameter. There are bobble stitches, picots, arches, and fringe. But no part of this rug is all that hard. It is mostly worked in chains and double crochet. And so, without further ado, I offer up the amazing, delicious, yarn-guzzling giant doily rug.


Giant crochet doily rug

Giant crochet doily rug
For this project, I wanted something softer than what the other people were achieving with their rope crochet, so I used Lion’s Brand Hometown USA in New York White, 9 skeins of it. It is VERY chunky and VERY soft and gave me just what I wanted. I also used a Size N (9 mm) crochet hook. I will warn you, after a few hours of this, your wrists and hands will HURT. It’s still worth it.
Special stitches: PICOT — Chain 3, slip stitch into first chain. BOBBLE — YO, insert hook into stitch, YO, draw through 2 loops (do this 5 times until you have 6 loops on your hook), YO and draw through all loops. Slip stitch into same stitch.
Gauge: It doesn’t matter. Just keep your tension even throughout and everything will be fine.
With white, ch 8. Join to create circle.
Row 1: Work 20 DC into circle.
Row 2: Ch 4 (counts as first DC and ch 2). Skip 1 st, DC in next st, ch 2 around. Join with sl st. (30 st)
Row 3: Ch 2 (counts as first DC). DC in same st, 1 DC in next st. *2 DC in next st, 1 DC in next st. Repeat from *. Join with sl st. (45 st)
Row 4: Ch 2 (counts as first DC). DC in same st and next 3 st. 2 DC in next st. *DC in next 3 st, 2 DC in next st. Repeat from *. Join with sl st. (56 st)
Row 5: Ch 2 ( counts as first DC). DC in same st and next 3 st. 2DC in next st. *DC in next 3 st, 2 DC in next st. Repeat from *. Join. (70 st)
Row 6: Ch 2 ( counts as first DC). DC in same st and next 3 st. 2DC in next st. *DC in next 3 st, 2 DC in next st. Repeat from *. Join. (88 st)
Row 7: Ch2 (counts as first DC). DC in same st. *Ch 3, sk 2 st, DC in next 2 st. Repeat from *. Join. (110 st)
Row 8: Ch2 (counts as first DC). DC in same st and next 3 st. 2DC in next st. *DC in next 3 st, 2 DC in next st. Repeat from *. (140 st)
Row 9: Ch2 (counts as first DC). DC in same st and next 4 st. 2DC in next st. *DC in next 5 st, 2 DC in next st. Repeat from *. Join. (168 st)
Row 10: Ch 2 (counts as first DC) DC in next st. *Work bobble in next st, DC in next 2 st. Repeat from *. Join. (168 st)
Row 11: Ch 1 (counts as first sc). Hdc in next st, dc in next st, tr in next st, dc in next st, hdc in next st, sc in next st. *sc in next st, hdc in next st, dc in next st, tr in next st, dc in next st, hdc in next st, sc in next st. Repeat from *. Join. (168 st)
Row 12: Sl st into next 2 st, sc in tr st, ch 5, sk next 6 st, sc in next st (in tr). *ch 5, sk next 6 st, sc in tr. Repeat from *. Join to first sc. (144 st)
Row 13: Ch 2 (counts as first DC) DC in same st and next 5 ch. 2 DC in next st (top of sc), *Dc in next 5 ch, 2 dc in top of sc. Repeat from *. Join. (168 st)
Row 14: Ch 2 (counts as first DC) DC in same st and next 4 st. *FP DC around st directly below and left of the st you just DC in. DC in next empty st (this will be behind and slightly to the right of the BP DC you just made) and in the next 6 st. Repeat from *, ending in 3 DC. Join. (189 st)
Row 15: Ch 2 (counts as first DC) DC in same st and next 3 st. *FP DC around previous FP DC. DC in next empty st (this will be behind and slightly to the right of the BP DC you just made) and in the next 3 st. Reduce one st. DC in next 2 st. Repeat from *, ending in 4 DC. Join. (189 st)
Row 16: Ch 2 (counts as first DC) DC in same st and next 2 st. *FP DC around previous FP DC. DC in next empty st (this will be behind and slightly to the right of the BP DC you just made) and in the next 3 st. Reduce one st. DC in next 2 st. Repeat from *, ending in 5 DC. Join. (189 st)
Row 17: Ch 2 (counts as first DC) DC in same st and next st. *FP DC around previous FP DC. DC in next empty st (this will be behind and slightly to the right of the BP DC you just made) and in the next 3 st. Reduce one st. DC in next 2 st. Repeat from *, ending in 6 DC. Join. (189 st)
Row 18: Ch 1. Sc in same stitch. *Ch 9, sk next 8 st, sl in next 3 st. Repeat from *. Join.
Row 19: Sl st into 9-ch sp. Ch 2 (counts as first dc), 13 dc in each ch-9 sp. Join.
Row 20: Ch 1. sc, ch 1, sk 1 st, hdc, ch 1, sk 1 st, dc, ch 1, sk 1 st, (tr, ch 1, tr, ch 1, tr, ch 1) in next st, sk 1 st, dc, ch 1, sk 1 st, hdc, ch 1, sk 1 st, sc. Repeat once for each 13-dc arch. Join.
Row 21: Sl into first ch 1 sp. Ch 2, dc, picot, ch 1, *dc into next ch 1 sp, picot, ch 1. Repeat from *. Join. Tie off.
PLEASE NOTE: I may offer this as a PDF at a later time. It all depends on how much free time I have and how much the software ticks me off. LOL In any event, this pattern is mine, it is original, and you may use it to your heart’s content, so long as you do NOT redistribute it or reprint it. Anyone caught selling it or claiming it as their own will be tracked down by my crack team of rabid lawyers and made to suffer. I’m not kidding. Not even a little bit. But please feel free to link to this page and share as much as you like for free, provided that you give me credit. This was a LOT of work and produced streams of curse words that even I didn’t know I knew. So give me my due. LOL Enjoy!
Trish
THANK YOU!!!!
I’ve been trawling through Pinterest and the internet in general looking for instructions for one of these. Whilst I could have just picked up a hook and yarn and given it a go, having someone actually do all the proper research for you is just marvellous! Thank you again and BTW… yours is way prettier than any others I’ve seen 🙂
i am blown away by this. It’s a credit to you. Thanks for the pattern too 🙂
It’s beautiful. Thank you for posting the pattern!
GypsyDancer, thank you for your kind words. Like you, I was looking everywhere for a workable pattern. So, I finally gave up and decided to be the one who figured things out for a change. LOL Post a pic of yours when it’s done. I’d love to see it.
Christine and Vickie, thank you. I’m glad you like it. And I would love to see pictures of yours when they’re done.
Really lovely!!!
I can’t wait to see what you create next. I’m new to your site, and look forward to coming back.
You might consider self-publishing your patterns. No doubt you would have lots of fans ready for such a book. If you have already done so, please share info. Thanks.
Thank you, Olivia. You’re too kind. Actually, I’ve been working on a book of patterns and it’s nearly done. But my husband is a publisher, I’m an editor. We’re both published authors. This would be my/our first foray into craft publishing though. I will certainly make a post when the book is put together.
Love this pattern. Thanks for making it available.
Thank you so much Trish for going through all the pain and agony to make the beautiful rug and have the heart to share it. It’s beautiful.
What is a FP Dc starting in row 14?? Then BP DC…? (Front post/ back post?) and I’m having trouble ending up with the same number of stitches each round…maybe you could clarify?
Thanks,Vicki
FP DC means a Front Post Double Crochet. BP is Back Post. You insert the hook around the top post of the stitch in row 14, then work a DC like usual. Starting the stitch one row down and one stitch behind gives it that spiral effect. If your stitch count is off, look to the turning/joining stitches. I found that messed me up more than once and I had to backtrack because I was forgetting to DC in the turning ch 2, or I was accidentally putting an extra stitch in the first of those 2. I hope that helps.
fantastic!!! love it!!!
Thank you!!!
This is beautiful and such an inspiration! Thank you.
It is exquisite. I haven’t been so touched by something in a very long time. Thank you for sharing the information and knowledge you have. I am crazy for this rug. I don’t think I could actually step on it though. I am thinking of draping it from the foot of my bed or the back of a bench or table. So lovely.
Wow, I’m completely blown away by this. It’s so beautiful! I will definitely give this a go when I get enough yarn accumulated 🙂 Thanks for the great pattern!
Did you treat it with anything afterwards? I made a large size doily from regular thick yarn and it was too floppy and wouldn’t lay right. Maybe the pattern I chose was too open, but now it just drapes over my couch!
I used the really fat Lion brand yarn and oddly, I didn’t spray it with anything or even block it. I just tied off the last stitch and tossed it on the floor. It’s still under the piano, looking pretty perky. I give it a good shake once in awhile and don’t let the dog on it, but it’s really sturdy and thick.
I’ve been wanting to do one of these but don’t like crocheting with five strands of yarn. And Homespun is my favorite yarn. Thanks so much for sharing
Lovely! have started to make but a
have a question. After each round, do you join the round by slip stitching into the top of the first stitch? Example: after the 20th double crochet of the first round, do you slip stitch into the top of the first double crochet before you begin the chain 4 of round two?
Thanks for your help!
Maryann, I feel so silly for not putting that in. Yes, always join the rows with a slip stitch before you start the next round.
And thank you all for the lovely comments.
For this 80 year old crocheter,I think it might be to heavy. So, I will try to use size 10 ceochet thread and a size 7 hook.
I made your page into a pdf file for my personal use. I will send it to you if you would like. I did not put any securities on the file so you can edit it to your satisfaction. TFS the pattern !
Wow… this is amazing. I have been working on tiny little doilies for a couple of weeks and really struggling. I love how you did this and will make one very soon. I cannot thank you enough for sharing this lovely pattern!
Hi! Firstly, thank you for such a great pattern. I am currently on row ten (making the bobbles) with 168 stitches on row 9….but I am getting curly edges. This is my third attempt. I made it to row 12 and it looked like a lettuce leaf! So I ripped it apart and started again, being super careful not to add extra stitches. Yours appears to be flat – should I carry on with the bobbles? Do they help with the rippling effect? Thanks again!!!
Jackie: I found when I started the bobbles, that it was quite ripply and looked like a head of lettuce as you say. I ripped out the bobble row and did it again, only MUCH tighter. It made no difference. So, I forged ahead and by the time I hit the last row, it was straightened out. I didn’t even block it. I just tied it off, tossed it on the floor and took the pictures you see here. Good luck!
Rhonda, you are an absolute angel! I would very much appreciate the PDF, since I’ve been doing way too much editing and writing work to get around to converting it. And you better believe I’ll give you credit for it too.! LOL You can email it to trish (at) danceswithwools.net. God bless!
I forged ahead and kept adding rows and found that the empty loops did a wonder at flattening out the rug. I have to order one more skein – I am one loop short on row 19 and have yet to do 20, so it will take me 10 skeins (Jiffy Thick and Quick). It is GORGEOUS! Again, many thanks!
I have been dreaming of making one of these for a long time. I didn’t want to invest so much into the cotton rope and wondered if it would be soft enough. This is just beautiful! And more affordable to make. I have found several patterns, but yours is by far the best. I’m going to give it a try and post pictures when complete. Thank you for sharing your talent!
Very good info. Lucky me I recently found your site by chance (stumbleupon).
I have bookmarked it for later!
Thank you so much for sharing ur stunning rug pattern. It has been a dream of mine to make one of these….not sure which yarn to purchase though as I’m in Australia. How would u describe the weight of the yarn please? Hope I can find a suitable substitute. Thanks again 🙂
Btw is the PDF available? Thank you
I am making this beautiful rug!! Thank you so much for the pattern. I am making it for a dear sweet lady in my life who has mentored so many ways in my life. Her home is all white and she has several white throw rugs. It will be perfect in her home. I am stuck though 🙁 I am on row #12. My stitch count from row #11 is correct. When I add row #12 is where I mess up. In row #11 I did sc, hdc, dc, tr, dc, hdc, sc. Adding row #12 does not come out. I do not end up with enough big spaces and it is quite smaller then the previous row. I hope this makes sense. Help!!
Absolutely Gorgeous!!! Thanks so much for the share of the pattern ? CHEERS TO YOU TRISH!! May the finished product be sold with credit given to you for the pattern??
love the transitions in this it reminds me of ripples in water.
Also figuring the math in sticthes is key, i made a circle blanket and keeping track of increases on each round was difficult when counting every stitch was painful.
with the way designed mine, it looks like a spiral when it was done in the same stitching.
Hello I love your blog. Linkei your carpet, but surely I quoted your blog. Congratulations. Hug, Leon
OMGosh this is just beautiful!!!! You are SO talented!!!!!!!! Thank you for posting the instructions…I may start crocheting again just to make this.
I absolutely LOVE this rug!!! Having issues though. Rd 7 I always have one st left!! Torn apart 6 times & always comes out the same. PLEASE HELP 🙂
Thank you so much for providing this pattern free; that is incredibly generous given the amount of time you must have spent on it.
What I would like to know is approx what size the rug is across the diameter, please?
Thank you a LOT for this pattern. 🙂 I just finished a carpet using it as the guideline.
I used two colors, making the bobble row and rows 19-20 with a lighter brown and the rest with a darker brown.
I found that the stitch count in this pattern is unfollowable, though. For example, if you have 189 stitches in the end of row 17, on the row 18 it’s impossible to *skip 8 and sl. 3* to create each loop and end up with 20 loops as in the picture (that would require 11*20=220 stitches on the row 17). Things just stop matching somewhere around the 14th or 15th row.
Still, I made my own adjustments and the result ended up being DELICIOUS. <3 Thank you so so much for providing this. 🙂
I am trying to make this and am at the end of round 8 and have 140 st at the end. When I follow the instructions as written – I do not end up with 168 st at the end of row 9! 🙁 I have tried 3 times and keep ending up with 164. No idea what I am doing wrong. Sigh……so confused. Any chance the number is off and not me?
I am doing this as my first project… I know, I am crazy! I allow myself to be off a bit where number of stitches are concerned, but after the bobbles in row 10 I definitely had way more stitches/chains than when I finished row 9. Am I not supposed to count some of the “stitches” created around the bobbles (as in skipping them when doing row 11)?
Thank you so much for providing this pattern free; that is incredibly generous of you.
I’ve been searching for the pattern, but can’t find one as beautiful as you made.
Great job.
Thank-you so much, this rug is gorgeous and I am making it as we speak…my daughter is going to be ecstatic! I’m using super thick plush baby yarn and it’s turning out wonderful, will be super plush on the feet!!!!
Hello. It’s possible that you send me the share of the rug ?
Hugs from Poland
Sylwia
Thank you for sharing this pattern. As I live in Australia I will have to see if there is a conversion so I can give it a try. It is beautiful you clever thing.
I love this rug! Do you also sell these? I have been looking for one to purchase.
Thank you for the beautiful pattern.
Laura
You are divine as well as your lovely lovely did I say lovely crochet rug. Thank you for printing the steps and your sweet agony, can I say so worth it. I so want to make one too.
The construction is Divine.
ps. do you happen to have a larger image so I can see the stitches, this is only 1 inch square…pretty please…lol